DATA Migration IN S4HANA:
- Migrate using files
- Migrate using staging Tables
- Migrate directly from SAP System
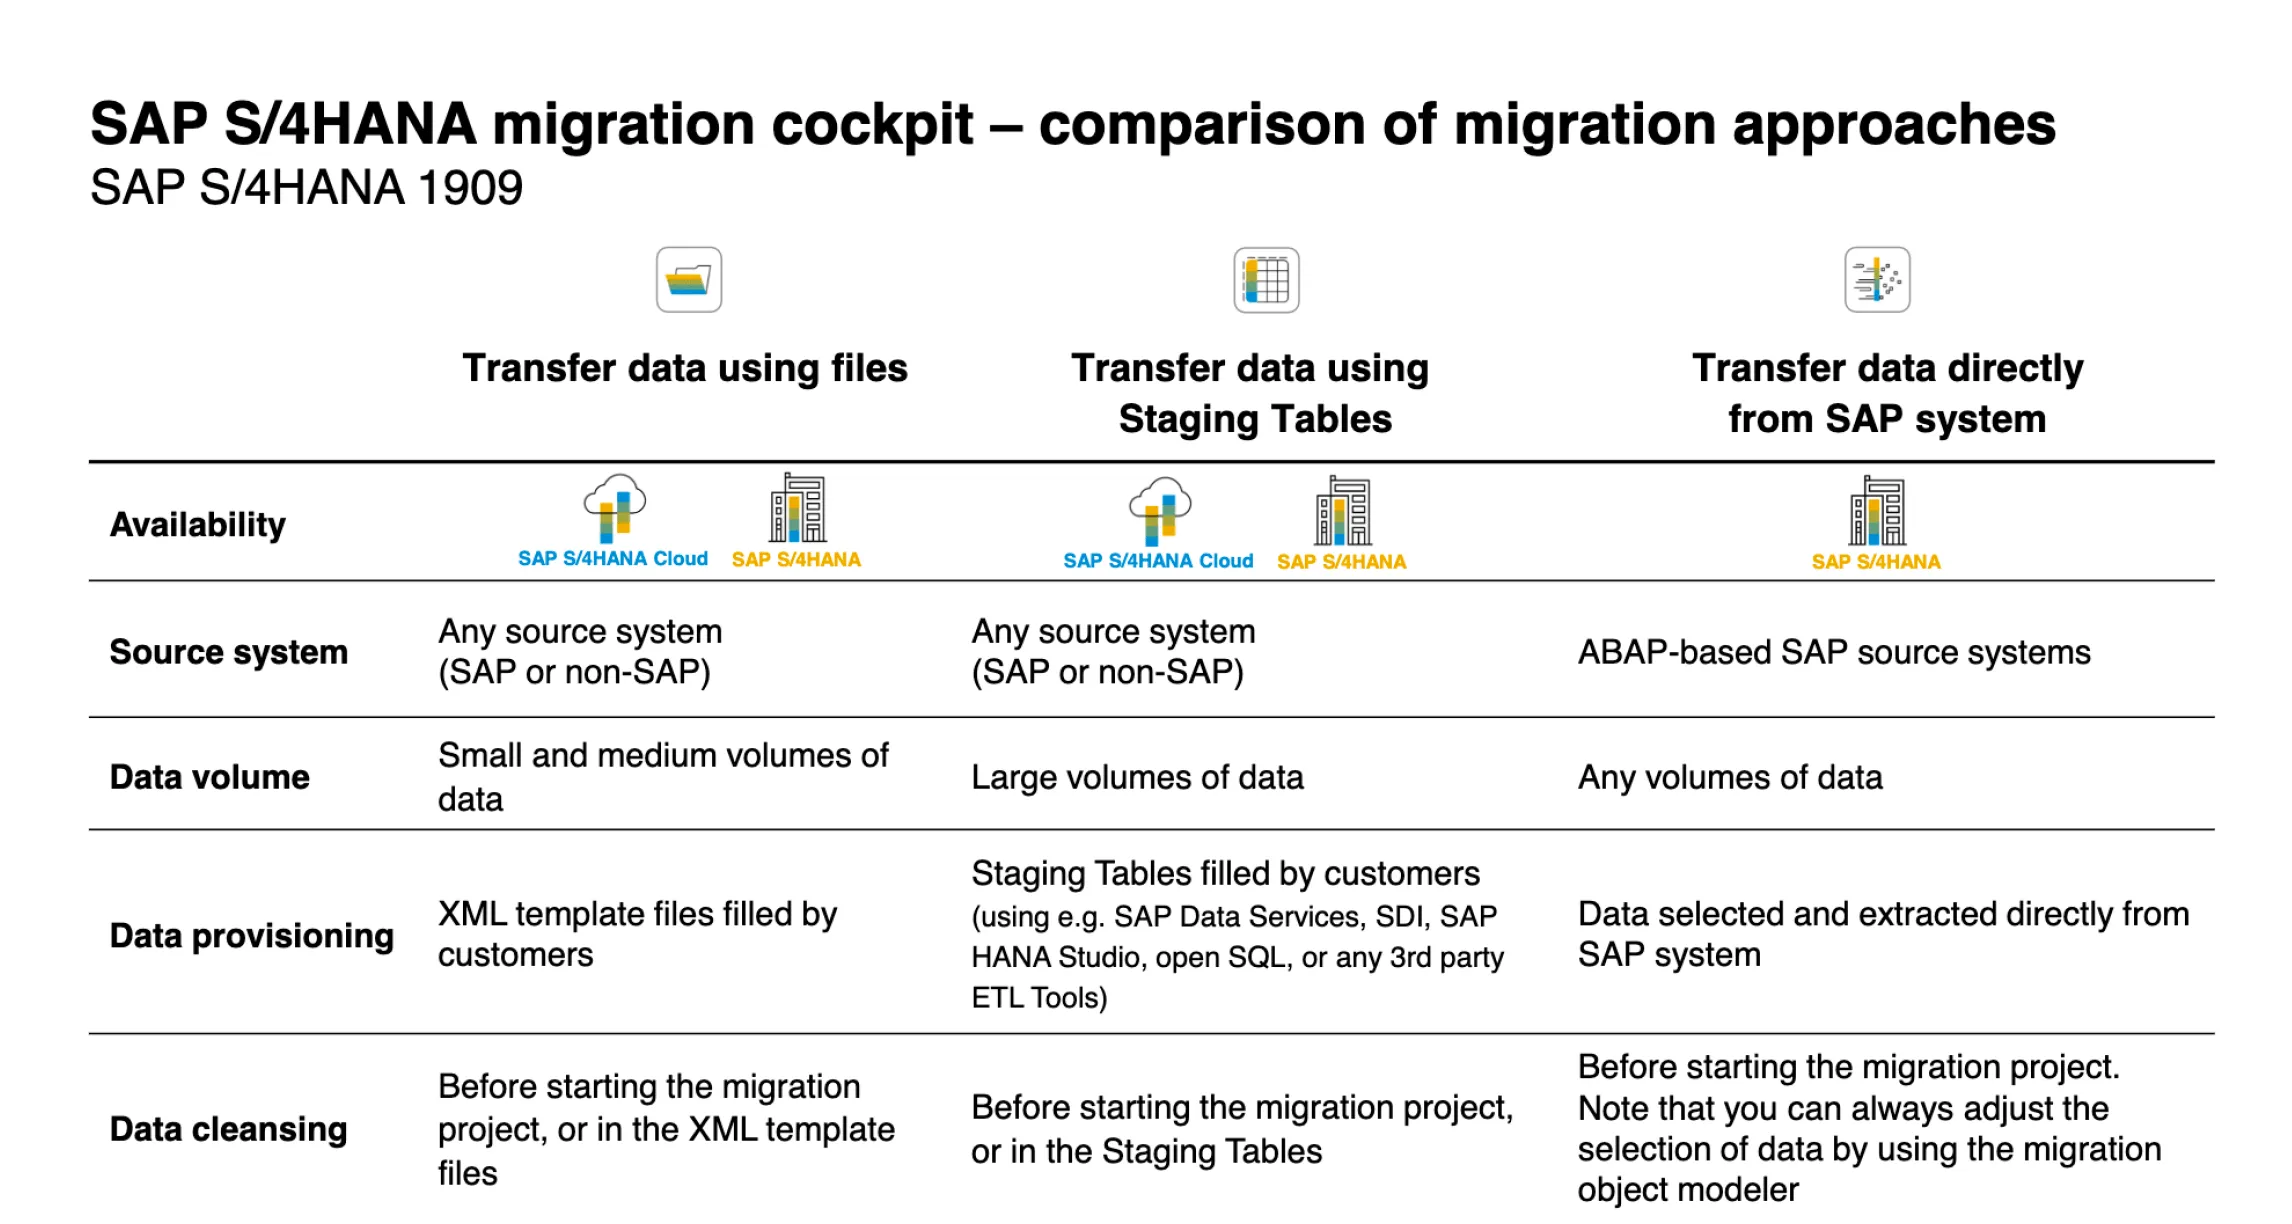
S4HANA - Migration Cockpit
Section titled “S4HANA - Migration Cockpit”ECC - LSMW
Section titled “ECC - LSMW”Show extracted text
SAP LSMWStep by Step ProcessSajiv FrancisFebruary 2020Table of ContentsLEGACY SYSTEM MIGRATION WORKBENCH - TRANSACTION DATA UPLOADS................................ .......3MAINTAIN SOURCE STRUCTURES ................................ ................................ ................................ ............. 52MAINTAIN SOURCE FIELDS ................................ ................................ ................................ ..................... 55TABLE OVERVIEW. ............................................................................................................................................ 57PASTE THE COPIED DATA IN SAP LSMW TABLE.................................................................................................... 58MAINTAIN STRUCTURE RELATIONS ................................ ................................ ................................ ........... 61MAINTAIN FIELD MAPPING AND CONVERSION RULES ................................ ................................ ................... 63SPECIFY FILES ................................ ................................ ................................ ................................ ...... 69ASSIGN FILES ................................ ................................ ................................ ................................ ...... 75READ DATA ................................ ................................ ................................ ................................ ........ 79DISPLAY READ DATA ................................ ................................ ................................ ............................. 81CONVERT DATA ................................ ................................ ................................ ................................ ... 83DISPLAY CONVERTED DATA ................................ ................................ ................................ .................... 85CREATE BATCH INPUT SESSION ................................ ................................ ................................ ................ 87RUN BATCH INPUT SESSION ................................ ................................ ................................ .................... 89DOCUMENT OVERVIEW: .................................................................................................................................... 91Legacy System Migration Workbench - Transaction data uploadsWhat is the LSM workbench?The LSMW (Legacy System Migration Workbench) is a tool based on SAP software that supports singleor periodic data transfer from non-SAP to SAP systems (and with restriction from SAP to SAP system). Itscore functions are:• Importing legacy data from PC spreadsheet tables or sequential files• Converting data from its original (legacy system) format to the target (SAP) format• Importing the data using the standard interfaces of SAP (IDoc inbound processing, Batch Input,Direct Input)Which data can be migrated using the LSMW?• By means of standard transfer programs: a wide range of master data (e.g. G/L accounts,customer master, vendor master, material master, bills of material) and transaction data (e.g.financial documents, sales orders)• By means of recording of transactions: further data objects (if the transaction can be run in batchinput mode)GO to SAP Easy Access Session and follow the following steps:GO to Transaction code “LSMW” in C ommand box from the SAP Easy AccessSession/Window/Screen:Enter Tcode – LSMW Click as belowClick on "Continue (push button)"Update following fields with Unique name for Project, Subproject and Object.After update the below fields, click “Enter” than click “Create (Shift+F1)”.Update the description for Project, Sub Project and Object and click on “Continue”.Now “Execute” or press CTRL+F8.Maintain Object AttributesStep 1 : Now Select 1st step “Maintain Object Attributes” and “Execute” or press CTRL+F8.Click on “Display<->Change” tab as shown below.Click on “Batch Input Recording” radio button tab as shown below.Click on recording “Overview” as shown below.Select /click on “Recordings” as shown below.Select /click on “Create Recordings” as shown below.Recording Overview.Update Recording and Description fields and click on “Continue” or Enter.Note: In “Recording” field NO space and Special character allowed (alphanumeric allowed).Insert Transaction code or required transaction data upload transaction code.(In this case it is F-02/FB01).Update Transaction code “F-02” and click on “Continue” or enter.Transaction code F-02 Overview/window/session/screen.Update required & necessary fields as shown below (in this case filled required some of fields forposting). Than press “Enter”. (Header data and Debit line item).Update “Amount” and “Text” field than click on “More data” for assign cost objects as shownbelow. (Debit line item data).Update “Cost Center” field and click on “Continue” or enter as shown below. (Debit line item data).Screen 2:Update “Posting Key” and “Account”. Than press “Enter”.(Credit line item data).Update “Amount, Value & Text” fields than click on “More data” tab as shown below.(Credit line item data).Update “Profit Center” and click on “Continue” or enter. (Credit line item data).Go to “Document” tab on menu bar and click on “Simulate” option as shown below.Entry Overview as shown below and Click on “Save” button or CTLR+S. (Debit and Credit line item).After Save the Transaction, system enter in the below overview with “Screen Field” name and“Transaction data” .Note: Page 1Note: Page 2Click on “Default All” tab on Application toolbar.Click on “Default All” tab, Field Name and Description will auto update as shown below.Note: Page 1 (Debit line item data).Note: Page 2 (Credit line item data).Note: Page 3(Last two row are included in page 3 and same can be ignored at the time of prepared excel file oftransaction data for uploading purpose).Before going to next process please read and understand the below info.Important Info:If you compare Page 1 (Debit line) and Page 2 (Credit line) there are 4 Field names are same that are:1.NEWBS Posting Key for the Next Line Item2.NEWKO Account or Match code for the Next Line Item3.WRBTR Amount in document currency4.SGTXT Item TextWe need to change the Page 2 (Credit line) Field name with like “NEWBS_2” for all 4 Field names.(If we not change the second same field name, will get error at the time of file upload).Double click on page 2 (Credit) “NEWBS” field name and change to “NEWBS_2” and click“Continue” or enter.Same as above process do it for remaining 3 fields that are “NEWKO”, “WRBTR” and “SGTXT”like“NEWKO_2”, WRBTR_2” and “SGTXT_2”.After Completion of Field name change, click on “Save” button or CTRL+S.Go to Menu Bar click on “System→List→Save→Local File”.Note: Exporting the Filed name and Description in excel file for preparing the transaction data.Select “Spreadsheet” radio button and click on “Continue” or enter.Update “File Name.XLS” with simple name & excel format (in this case File name is“LSMWTrans.xls) and click on “Generate” button for save the file as shown below (Save ondesktop).Once again click on “Save” and click on “Back” button or press F3.Again click on “Back” button for press F3.Select “Recording field” and press F4 (Field will get update) and click on “Save” and “Back” button asshown below.IDOC Structure
Section titled “IDOC Structure”-
Control Record: The administration part which has the type of idoc, message type, the current status, the sender, receiver etc.
- All control record data is stored in EDIDC table. The key to this table is the IDOC Number
- It contains information like IDOC number, the direction(inbound/outbound), sender, recipient information, channel it is using, which port it is using etc.
- Direction ‘1’ indicates outbound, ‘2’ indicates inbound.
-
Data Record: The application data record which contains the data, these are called the data records/segments.
- Data record contains application data like employee header info, weekly details, client details etc
- All data record data is stored in EDID2 to EDID4 tables and EDIDD is a structure where you can see its components.
- It contains data like the idoc number, name and number of the segment in the idoc, the hierarchy and the data
- The actual data is stored as a string in a field called SDATA, which is a 1000 char long field.
-
Status Record: Gives you information about the various stages the idoc has passed through.
- Status record is attached to an I-DOC at every milestone or when it encounter errors.
- All status record data is stored in EDIDS table.
- Statuses 1-42 are for outbound while 50-75 for inbound.
IDOCS - Outbound Process
Section titled “IDOCS - Outbound Process”- Create segments(WE31)
- Create an idoc type(WE30)
- Create a message type (WE81)
- Associate a message type to idoc type(WE82)
- Create a port(WE21)
- If you are going to use the message control method to trigger idocs then create the function module for creating the idoc and associate the function module to an outbound process code
- If not, create the function module or stand-alone program which will create the idoc
- Create a partner profile(WE20) with the necessary information in the outbound parameters for the partner you want to exchange the idoc with to trigger the idoc.
IDOCS - Inbound Process
Section titled “IDOCS - Inbound Process”- Creation of basic Idoc type (Transaction WE30)
- Creating message type (Transaction WE81)
- Associating the Message type to basic Idoc type (Transaction WE82)
- Create the function module for processing the idoc
- Define the function module characteriztics (BD51)
- Allocate the inbound function module to the message type(WE57)
- Defining process code (Transaction WE42)
- Creation of partner profile (Transaction WE20)
IDOC Configuration Guide
Section titled “IDOC Configuration Guide”Show extracted text
IDOC CONFIGURATIONJanuary 2021Table of ContentsIDoc Configuration ................................ ................................ ................................ ......................... 3Purpose ................................ ................................ ................................ ................................ .........3Prerequisites ................................ ................................ ................................ ................................ ..3Setting Up IDoc ................................ ................................ ................................ .............................. 3Setting Up IDoc Administrator ................................ ................................ ................................ ........3Defining Logical System and Assign Number Range ................................ ................................ .........3Setting Up Application Link Enabling ................................ ................................ ............................... 4Creating IDoc Configuration File ................................ ................................ ................................ ......4Setting Up Partner Profile ................................ ................................ ................................ ...............6Procedure: .............................................................................................................................................................. 6Result ..................................................................................................................................................................... 8Changing Partner Profile Settings (Optional) ................................ ................................ ...................8Creating BAPI/ALE Interface (Optional) ................................ ................................ ........................... 8Background ............................................................................................................................................................ 8Prerequisites .......................................................................................................................................................... 9Procedure ............................................................................................................................................................... 9IDoc Monitoring Functionality ................................ ................................ ................................ ...... 11Prerequisite .......................................................................................................................................................... 11Procedure ............................................................................................................................................................. 11Troubleshooting ................................ ................................ ................................ ........................... 11Performance of IDoc Inbound Handling in SAP ................................ ................................ .............. 11Problem ................................................................................................................................................................ 11Resolution ............................................................................................................................................................ 11Appendix ................................ ................................ ................................ ................................ ..... 126.1 Source Code for Report Z_DM_IDOC_SETUP ................................................................................................ 12IDoc ConfigurationPurposeThis configuration guide provides the information that you need to set up the IntermediateDocument (IDoc) for processing SAP S/4HANA objects.Prerequisites• The Configuration Guide − Getting Started (also called Quick Guide) has beencompleted successfully.• The SAP user has sufficient authorizations for the following tasks.Setting Up IDocSetting Up IDoc Administrator1. On the SAP Easy Access screen, access the activity using the following transaction:Transaction code SALE2. Choose Basic Settings → IDoc Administration.3. Switch to Change mode.4. Select the User (US) object type.5. In the Identification field, enter the username of a valid SAP user (to be assigned as theIDoc administrator).6. Save the entry.Defining Logical System and Assign Number Range1. On the SAP Easy Access screen, access the activity using the following transaction:Transaction code SALE2. Choose Basic Settings → Logical Systems → Define Logical System.3. Choose New Entries.4. Make the following entries:Field User Action or ValuesLogical System BOBJTFRName Data Transfer5. Save the entry.6. On the SAP Easy Access screen, enter the following data:Transaction code OYSN7. On the Number Range Object Maintenance screen, enter EDIDOC. Choose Number Ranges.8. On the following screen, choose Change Intervals.9. On the Maintain Number Range Intervals screen, the From number and To number valuesare automatically generated. If not, enter those values.10. Save the entry.Setting Up Application Link Enabling1. On the SAP Easy Access screen, access the activity using the following transaction:Transaction code SALE2. Choose IDoc Interface/Application Link Enabling (ALE) → Modelling and ImplementingBusiness Processes → Global Organizational Units → Cross-System Company Codes.3. In the Choose Activity dialog box, double-click Cross-System Company Codes.Cross-system company codes are used in distribution in financial accounting.There’s one central system for each cross-system company code in the distributedenvironment. One company code must be assigned to this cross-system companycode on each system, involved in the distribution.When sending an IDoc with company code-dependent data, the company code isreplaced with the cross-system company code in all company code fields. Whenreceiving this kind of IDoc, the reverse conversion takes place on the target system.In this section, you maintain the cross-system company codes and allocate them tothe local company codes.4. Choose New Entries.5. In the Company code field, enter the company code to migrate (for example, 1010).6. Save the entry.7. Choose Back.8. Double-click Assign Company Code to Cross-System Company Code.9. Scroll to the row for the company code that you’re working on (for example,1010: CompanyCode 1010). In the Global CoCde column, enter the company code (for example, 1010).10. Save the entry.11. Repeat steps 2 to 9 for company code 1010.Creating IDoc Configuration File1. Create an empty text file named DM_IDoc_Partner_Profile_S4HANA.txt in theC:\Migration_S4HANA\MISC folder.If the MISC folder does not exist, create it.2. Copy the following table data into the given text file that you’ve just created.ACC_DOCUMENT BAPI XACC_STAT_KEY_FIG BAPI XACTIVITYTYPE_CREATE BAPI XACTIVITYTYPEGROUP_CREATE BAPI XACTIVITYTYPEGROUP_ADDNODE BAPI XBANK_CREATE BAPI XBOMMAT BOMM XCAP_ACTOUT BAPI XCHRMAS CHRM XCLFMAS CLFM XCLSMAS CLSM XCNPMAS CNPM XCOND_A COND XCOSMAS COSM XCOSTCENTERGROUP_ADDNODE BAPI XCOSTCENTERGROUP_CREATE BAPI XCOSTTYPE_CREATE BAPI XCREMAS CRE1 XDEBMAS DEBM XEQUIPMENT_CREATE BAPI XEXCHANGE_RATE BAPI XFIXEDASSET_CREATEINCLVALUES BAPI XFUNC_LOC_CREATE BAPI XINFREC INFR XINSPECTIONPLAN_CREATE BAPI XINTERNAL_ORDER_CREATE BAPI XKNOMAS KNOM XMATERIALRESERVATION_CREATE1 BAPI XMATMAS_MASS_BAPI BAPI XMATQM BAPI XMBGMCR BAPI XPORDCR1 BAPI XPREQCR BAPI XPROFITCENTERGROUP_ADDNODE BAPI XPROFITCENTER_CREATE BAPI XPROFITCENTERGROUP_CREATE BAPI XPROJECT BAPI XPURCONTRACT_CREATE BAPI XPURSAG_CREATE BAPI XQPGR BAPI XQPMK BAPI XQSMT BAPI XREFSETOFOPERATIONS_CBAPI’s
Section titled “BAPI’s”BAPIs are defined in the BOR(Business object repository) as methods of SAP business object types that carry out specific business functions.They are implemented as RFC-enabled function modules and are created in the Function Builder of the ABAP Workbench - SW01.
List of Standardized BAPIs:
Section titled “List of Standardized BAPIs:”- BAPIs for Reading Data - GetList() , GetDetail() , GetStatus() , ExistenceCheck().
- BAPIs for Creating or Changing Data- Create() ,Change(),Delete() and Undelete().
- BAPIs for Mass Processing -ChangeMultiple(), CreateMultiple(), DeleteMultiple().
Chat with Sajiv